
How to Clean Clear Aligner Buttons and Prevent Stains
Cloudy aligners and stained attachments often point to plaque or food debris left behind after meals. Knowing how to clean clear aligner buttons and attachments starts with brushing gently around each button and cleaning your trays before putting them back in. If you can’t brush right away, rinse your mouth and aligners with water.
It can be frustrating when clear trays lose their fresh, barely-there look, especially when you’re working to maintain your routine. Extra care around raised attachments and along the gumline helps clean spots that are easy to miss.
This guide explains how to clean around attachments, care for aligners, and reduce the risk of stains and cloudiness after meals. You’ll also learn which habits can leave residue behind, how to maintain oral hygiene while wearing aligners, and when persistent discoloration warrants a conversation with a dental professional.
Key Takeaways
- Brush gently around each attachment and along the gumline, where plaque can be easy to miss.
- Learn which everyday drinks and habits can contribute to stains, cloudiness, or odors.
- Use aligner-cleaning methods that avoid heat, abrasive toothpaste, and colored products.
- Build a practical after-meal routine to clean your teeth and trays before wearing your aligners again.
- Find out how an angled toothbrush can help you reach tricky areas, including around the back teeth.
Why Clean Clear Aligner Attachments?
Aligner attachments are small, tooth-colored buttons bonded to teeth to help guide tooth movement. Their raised edges can collect plaque and food debris, so brushing only the smooth, visible parts of each tooth may leave areas uncleaned. Brushing around every attachment helps you cover the full tooth surface, not just the parts that are easiest to see.
Plaque is a soft film that forms on teeth throughout the day. When it remains along the gumline, it can irritate the gums and contribute to inflammation. The gumline borders the tissues that support your teeth, so it deserves careful attention. Spaces between teeth, the backs of molars, and the edges around attachments can also be easy to miss, especially when you’re rushing.
Cleaning well does more than keep attachments looking clear. It supports gum health and helps limit plaque and trapped food around teeth. Brush twice a day, take time to clean around each attachment, and floss once a day to reach between teeth where a toothbrush may not. After meals, clean your teeth before putting aligners back in when you can. If brushing isn’t possible, rinsing your mouth and aligners with water can help clear loose food debris.
- Brush carefully around the edges of every attachment.
- Clean along the gumline, between teeth, and around the back molars.
- Build cleaning into your routine before aligners go back in after meals.
Oral health is part of overall health, though the relationship is still being studied. Research has found associations between gum disease and some health conditions, but an association alone does not prove that one causes the other. A consistent routine supports a healthy mouth and is a practical part of caring for your general well-being.
Pay attention to changes, too. Persistent bleeding or swelling, ongoing bad breath, or discomfort calls for professional attention, not more vigorous brushing. The goal is gentle, thorough cleaning. Pressing harder won’t help you reach places where plaque tends to collect.
Keeping attachments clean supports a more complete approach to oral care. Teeth, gums, and the spaces between them all need attention; a quick pass over front-facing surfaces isn’t enough. Small, repeated habits make the routine easier to maintain and help you care for areas that are otherwise easy to overlook.
The Science Behind Aligner and Attachment Stains
Clean clear aligners separately by rinsing and gently brushing the trays; brush bonded attachments while they’re on your teeth. Contact your orthodontist if an attachment feels loose or comes off, or if a stain persists despite gentle cleaning.
-
Identify Common Staining Causes
Notice what comes into contact with your teeth and trays each day. Coffee, tea, and red wine can stain Invisalign attachments, while soda and other highly pigmented drinks can discolor clear trays. Plaque and food debris left behind by an incomplete cleaning routine can also cause yellow stains, haze, or odor. Chlorhexidine and colored mouthwashes may contribute to staining, so don’t use colored products to clean trays.
-
Remove Surface Stains
Gently brush a visible stain on an attachment rather than scrubbing hard. Spillers Orthodontics recommends a paste made with one tablespoon of baking soda and ½ cup of water for gently brushing Invisalign attachments. Rinse thoroughly afterward. If discoloration remains or returns, arrange a professional assessment; persistent attachment stains may be addressed with dental cleaning or polishing.
-
Clean Attachments at Home
After meals, brush your teeth and each attachment before putting Invisalign back in. Use a soft toothbrush and small, careful strokes around raised edges, along the gumline, and over nearby tooth surfaces. After coffee, tea, or red wine, rinse your mouth with water and brush when possible. Remove food debris gently, and avoid forceful scrubbing that could irritate your gums.
-
Clean Aligners Separately
As soon as you remove your trays, rinse them with cool or lukewarm water, then gently brush them with a soft toothbrush and clear, unscented soap. Do this once a day. Toothpaste can scratch the plastic, and hot water can warp it. After meals, brush and floss before reinserting the trays. If you can’t brush, rinse your mouth and aligners with water first.
What Happens Around Attachments
Possible signs of a cavity or gum problem include persistent pain, sensitivity, bleeding, swelling, or a visible change near a tooth. These signs can have different causes, so a dental professional needs to assess them rather than relying on appearance alone.
- Look at each attachment when you remove your aligners. Check whether a button appears chipped, has changed shape, or feels different from the surrounding tooth. Don’t scrape it with a fingernail or sharp object. Noticing a change early gives you a clear detail to mention at your next dental or orthodontic appointment.
- Notice whether your aligner still fits as expected. If a tray suddenly feels unusually loose, won’t sit in place, or catches on one tooth, don’t force it down. An attachment may have shifted or come off, but fit can change for other reasons, too. Note which area feels different and contact your orthodontist for advice about your treatment.
- Pay attention to discomfort that continues. Brief sensitivity can happen for different reasons, but ongoing pain, bleeding, or swelling around a tooth deserves professional evaluation. Symptoms alone can’t diagnose a cavity or gum problem. Note whether the discomfort occurs while eating, brushing, or wearing your tray, then share that pattern with your dental professional.
- Keep bonded buttons intact while cleaning. Use your usual gentle brushing technique, and don’t pick at an attachment if food seems caught nearby. If something remains lodged or the area becomes sore, stop probing it. Repeated attempts with sharp tools can injure your mouth or disturb the bonded button; a dental professional can assess a persistent concern.
- Make observations part of your routine. As you learn how to clean clear aligner buttons and attachments, notice changes in comfort, appearance, or tray fit, not just whether your teeth look clean. A simple note such as “lower right attachment feels rough” is more useful than trying to identify a condition yourself. Knowing how to clean clear aligner buttons and attachments also means recognizing when a change needs professional attention.
How to Avoid Stains and Clean Attachments
Use a soft toothbrush to clean your teeth and gently brush around each attachment. Apply toothpaste to your teeth, not your aligner trays; clean trays separately with clear, unscented soap and a soft brush. Knowing how to clean clear aligner buttons and attachments also means protecting trays from heat and abrasive cleaners.
- Keep heat away from your trays. Rinse aligners with cool or lukewarm water as soon as you remove them. Hot or boiling water and dishwashers can warp the plastic and affect how trays fit. For example, don’t leave an aligner in a mug of hot water while getting ready to clean it.
- Choose the right brush and cleaning product. Use a soft toothbrush to clean your teeth and carefully brush around attachment edges. Once a day, brush the trays separately with a soft brush and clear, unscented soap. Toothpaste can scratch aligner plastic, so don’t use it on trays. For your teeth, choose toothpaste that suits your oral-care needs.
- Avoid colored cleaning products on aligners. Colored mouthwash can tint clear trays and isn’t a tray-cleaning solution. Rinse aligners with plain water after removing them, then clean them with soap. Rinse off the soap before wearing the trays again so residue doesn’t remain against your teeth.
- Plan for coffee, tea, and other drinks. Drink only plain water while wearing clear aligners; remove your trays for other beverages. Coffee, tea, red wine, and soda can stain trays or discolor attachments. After a dark drink, rinse your mouth with water and brush your teeth before reinserting aligners when possible. Using a straw may limit coffee or tea contact with your teeth.
- Use water when you can’t brush right away. After eating or drinking, rinse your mouth and aligners with water if you can’t brush immediately. After acidic foods or drinks, such as citrus or soda, rinse your mouth with water. These quick steps help clear residue before trays go back in and make your routine practical between meals. Learning how to clean clear aligner buttons and attachments includes keeping this rinse-and-clean routine gentle and consistent.
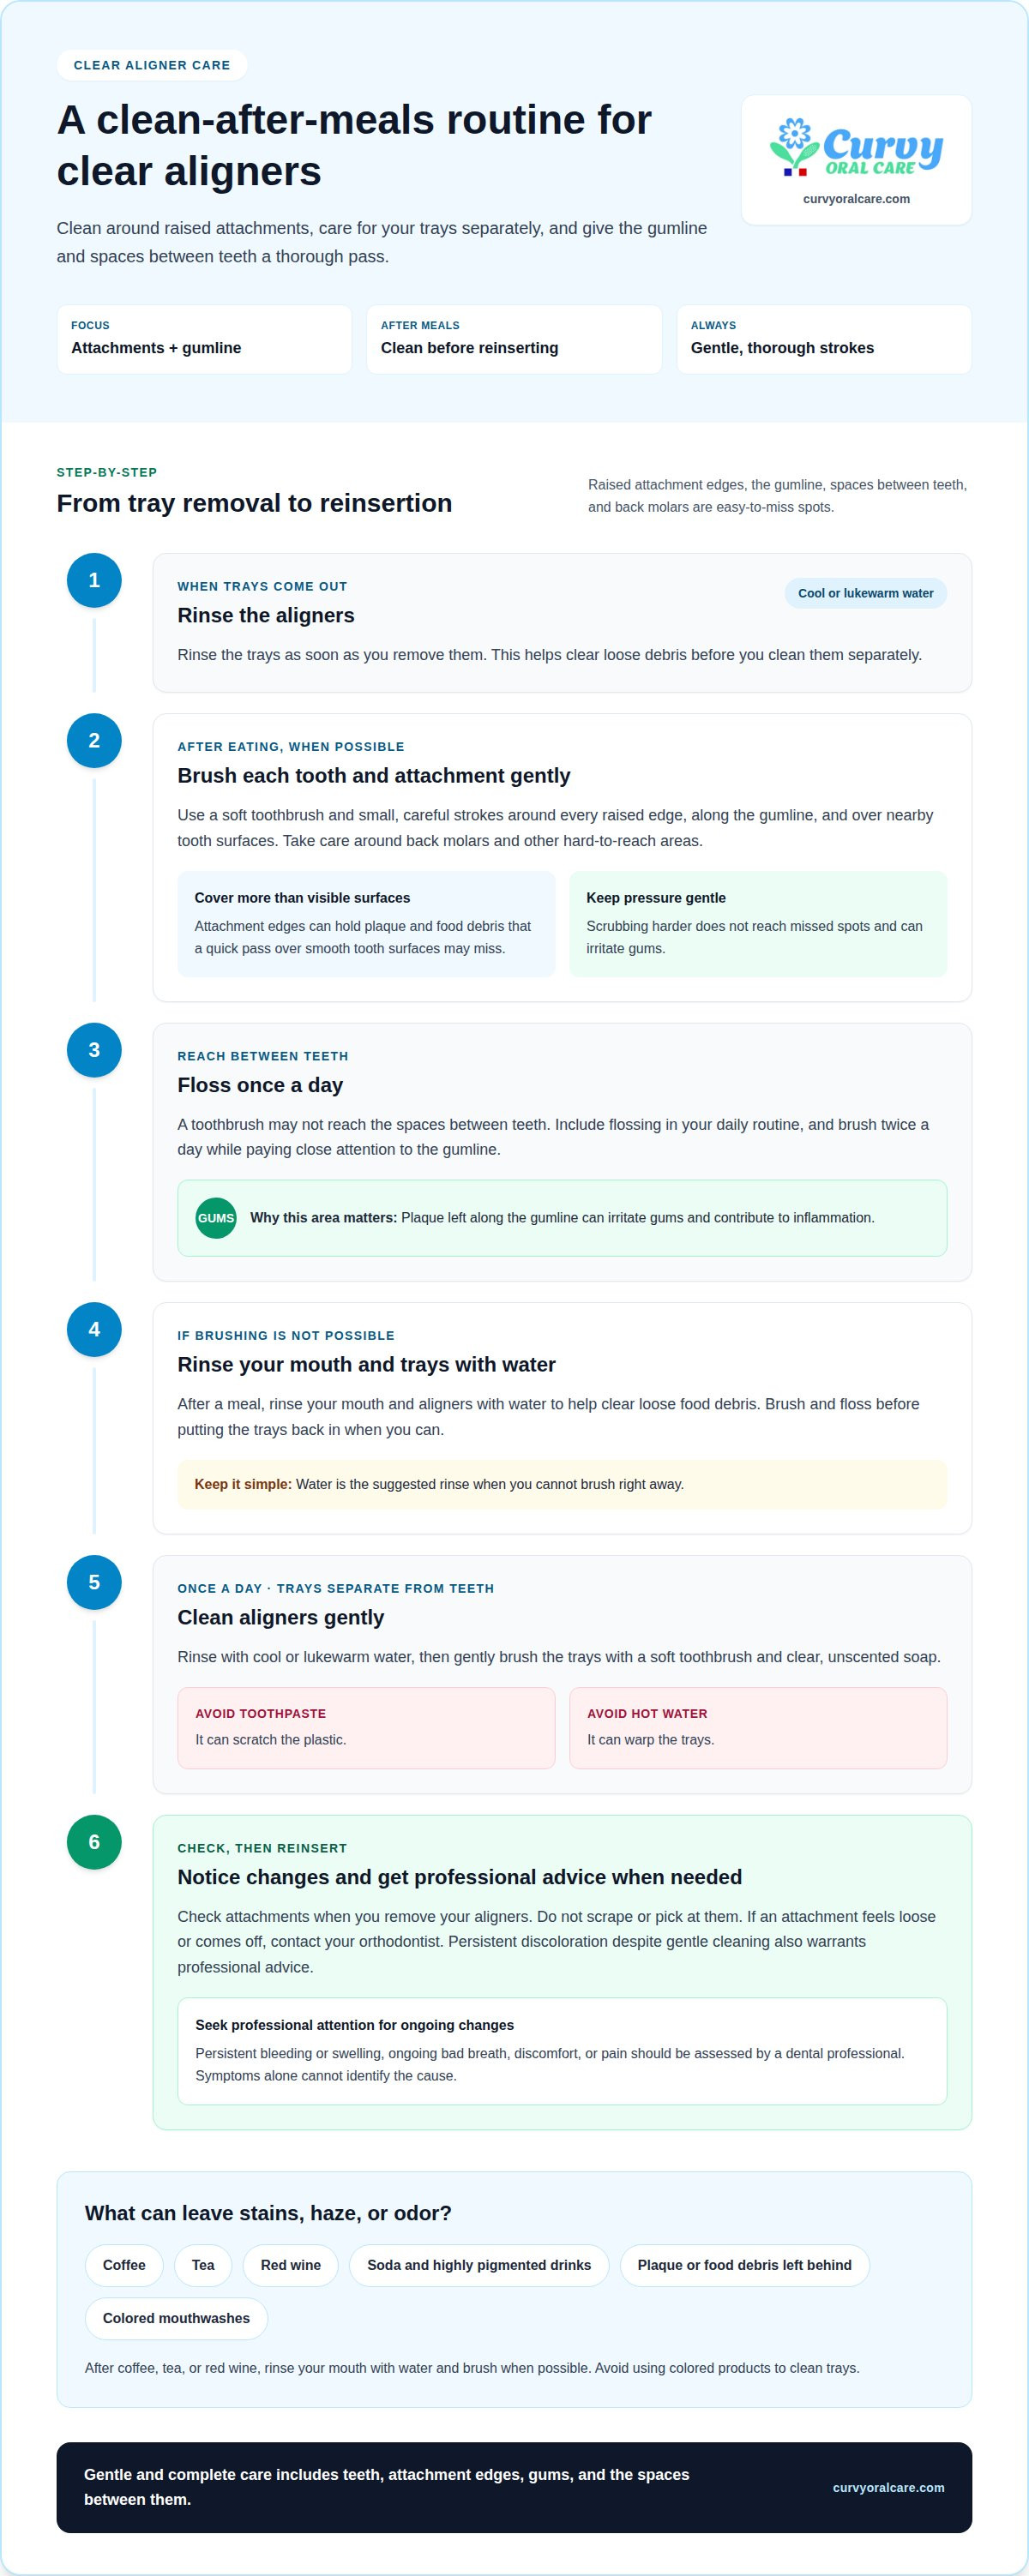
How to Clean Clear Aligner Attachments and Buttons at Home
Follow these steps to clean your teeth, bonded attachments, and removable trays as separate parts of your routine.
- Remove and rinse your aligners. Rinse the trays with cool or lukewarm water as soon as you take them out. This washes away loose saliva and debris before they dry on the surface. Set them aside safely while you brush your teeth and attachments.
- Brush around every attachment. Use a soft toothbrush and gentle strokes to clean each button’s edges, the surrounding tooth surface, and the gumline. Take extra care where an attachment sits near the gum or between neighboring teeth. Avoid forceful scrubbing; angle the bristles toward the border between the button and tooth.
- Clean between teeth and along the back molars. Floss once a day, guiding the floss gently between each pair of teeth and around the gumline. A toothbrush can’t reach every contact point. After eating, brush and floss before putting aligners back in when possible. If you can’t brush, rinse your mouth and trays with water.
- Wash the trays separately once a day. Gently brush them with a soft toothbrush and clear, unscented soap. Rinse thoroughly before reinserting. Avoid toothpaste on the plastic because abrasives can scratch aligners, and keep trays away from hot water that could warp them.
- Address surface stains gently. For a surface stain on an attachment, mix one tablespoon of baking soda with ½ cup of water to make a paste. Gently brush the affected area, then rinse well. Don’t use hard pressure or abrasive scrubbing. Persistent discoloration may need professional dental cleaning or polishing.
- Use optional tray-cleaning aids carefully. A dentist-approved, retainer-safe cleaner can be used to soak aligners for approximately 20 minutes, following its product directions. An ultrasonic aligner cleaner is another optional tool for stubborn debris and may be used a few times a week. Keep daily brushing and rinsing as the foundation of care.
Before putting trays back in, make sure your teeth and attachments feel clean and your aligners are rinsed. A steady routine helps prevent food debris from sitting against teeth beneath the trays.
Curvy Oral Care
Curvy Oral Care connects oral-care education with practical tools for a more consistent routine. If attachments make some brushing angles awkward, an angled toothbrush can help you position the brush toward difficult-to-reach areas, including back teeth. The angle supports access and brushing technique, while gentle, deliberate movement remains important around bonded attachments.
A soft-bristled angled adult toothbrush offers an option for adjusting your brushing approach around tooth contours. Guide the bristles carefully around the attachment and toward the gumline, rather than scrubbing across the tooth. Choose a brush that feels manageable in your hand, since control helps you follow the shape of each tooth.
Curvy Oral Care offers sonic toothbrushes, replacement brush heads, and brush head subscriptions. These options let you choose a brushing style that suits your routine and plan for replacement heads as part of ongoing oral care. Whichever brush you use, take time to reach each tooth surface and adapt your technique around attachments.
Keep your daily routine practical. Brush twice a day, floss once a day, and clean removable aligners separately. If you can’t brush after a meal, rinsing your mouth and aligners with water is a useful interim step. A toothbrush supports cleaning, but it doesn’t replace flossing or attention to the spaces between teeth.
Curvy Oral Care provides oral-care education and toothbrush options, not a substitute for care from a dental professional. Persistent bleeding, swelling, pain, a loose attachment, or ongoing discoloration calls for professional evaluation. A dentist or orthodontist can assess changes in your mouth and advise you based on your treatment.
If you’d like to discuss toothbrush options for your daily routine, get in touch with Curvy Oral Care.
Frequently Asked Questions
Why Do Aligners Get Cloudy, Stained or Smelly?
Food debris, plaque, and drinks such as coffee, tea, and red wine can leave trays cloudy, discolored, or unpleasant-smelling. Scratches can also make aligners look hazy because residue is harder to remove from the damaged surface. Rinse trays after taking them out, clean them daily, and store them in their case after rinsing. If odor or cloudiness remains, use a dentist-approved retainer cleaner as directed.
How do I clean around attachments without damaging them or my teeth?
Use a soft toothbrush and light pressure, guiding the bristles around each attachment’s edges rather than scrubbing across it. A mirror can help you see the gum-facing side and the area between neighboring teeth. If an attachment feels loose or comes off, don’t try to reattach it yourself. Contact your orthodontist for advice about the next step in your treatment.
How often should I brush and clean clear aligner attachments?
Brush your teeth and attachments twice a day, and floss once a day. Clean aligner trays separately once a day and rinse them whenever you remove them. After meals, brush and floss before putting trays back in when possible. If you’re away from home and can’t brush, rinse your mouth and aligners with water, then clean them properly when you can.
How do you remove plaque and food buildup around clear aligner buttons?
Brush gently around each button, paying attention to the border where it meets the tooth. Then floss between the tooth with the attachment and its neighbors, guiding the floss carefully along each tooth surface. For example, after a meal with food that tends to lodge between teeth, rinse first and brush and floss before reinserting the trays. Persistent buildup or gum changes need professional assessment.
What should I avoid when cleaning clear aligner attachments?
Keep hot or boiling water, dishwashers, and toothpaste away from removable trays because heat can warp them and toothpaste abrasives can scratch them. Avoid using colored mouthwash to clean trays, since it can tint clear plastic. Don’t scrub attachment edges forcefully or use sharp objects to scrape away residue. Gentle brushing and careful flossing are safer ways to clean around teeth.
The site is intended for users who are at least 18 years old; persons under 18 are not permitted to use or register. Information is provided on the Site “AS IS” for personal, non-commercial use only.
Health & Medical Disclaimer: This content is for educational purposes only and is not a substitute for professional dental or medical advice.

Article by
Aline Peixe Nebot
Aline Peixe Nebot is a Veterinarian and passionate advocate for better oral health, committed to raising awareness of oral health as a matter of public health. She actively promotes the importance of simple, effective oral care routines and works to educate the public about the often-overlooked link between oral health and overall systemic health. Her mission is to make better oral care knowledge accessible to everyone and encourage healthier habits for life.
Disclaimer
Disclaimer: The information provided in this article is intended for general educational and informational purposes only. It is not intended to replace professional medical, dental, or healthcare advice, diagnosis, or treatment.
Some content may be AI-assisted and is provided to support health education and awareness. While we strive to share accurate and up-to-date information, health recommendations and scientific evidence can evolve, and the information presented may not apply to every individual.
The connection between oral health and overall systemic health is an important and developing area of research. Associations discussed in this article should not necessarily be interpreted as proof of cause and effect.
Always consult a qualified dentist, physician, or other healthcare professional regarding your individual health, symptoms, medications, or treatment decisions. Do not delay or discontinue professional care based on information presented in this article.
This content is for education and awareness—not diagnosis or treatment.